🚚 FREE DELIVERY IN UKRAINE • 📞 QUICK ORDER: +380 63 571 3650 • 📚 STEM KITS FOR HOME, SCHOOL AND CLUBS
🚚 FREE DELIVERY IN UKRAINE • 📞 QUICK ORDER: +380 63 571 3650 • 📚 STEM KITS FOR HOME, SCHOOL AND CLUBS
🚚 FREE DELIVERY IN UKRAINE • 📞 QUICK ORDER: +380 63 571 3650 • 📚 STEM KITS FOR HOME, SCHOOL AND CLUBS
Lava Lamp Science Experiment for Kids
Science is fun for kids when it's hands-on learning through simple science experiments. Scientific experiment with a lava lamp
Science is fun for kids when it’s hands-on with simple science experiments. A lava lamp science experiment for kids is easy to do, quick to set up, and definitely tops the list of science activities to do with kids.
Children enjoy such experiments, and they learn complex scientific concepts without much effort. The lava lamp experiment is one of the science activities that kids of all ages love to do – preschoolers, kindergarteners, and older kids! This is a very fun experiment for adults too.
A visual delight – the lava lamp is soothing and almost magical! But did you know that there’s a lot of science behind the bouncing, popping bubbles and colorful fluid movement?
Content:
How to make a lava lamp with Alka Sletzer
Science behind a lava lamp
Do-it-yourself lava lamp without Alka Sletzer
A lamp glows in the darkness of the lava
A lava lamp will get your kids excited about learning science and get them interested in STEM.
This scientific activity is simple and cheap to set up. So get your kids involved and follow the whole process step by step to create their very own homemade lava lamp.
How to make a homemade lava lamp
A lava lamp is a simple and easy science experiment for kids that can be done using a few common ingredients. There are many ways to make a lava lamp at home.
Choose the one that interests you the most.
Quick tip: Before starting the experiment, make up some funny science jokes to get your child’s attention and get them fully involved.
Do-it-yourself lava lamp with Alka Sletzer
This is by far the most popular way to do this simple science experiment. This science challenge is so simple that even your little preschooler can do it without help.
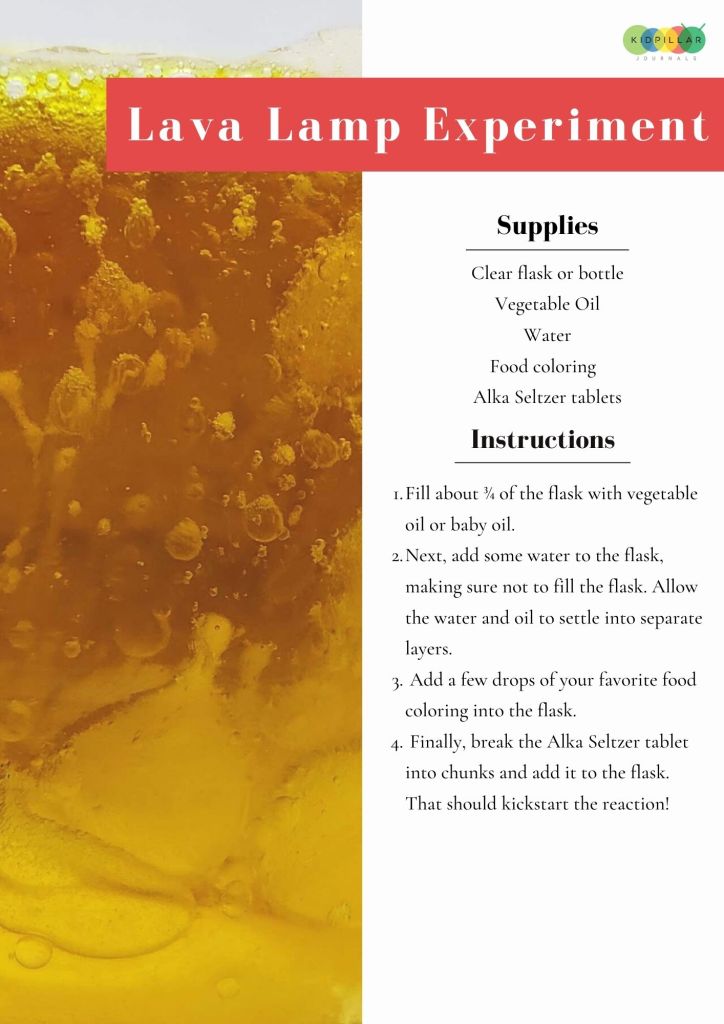
Materials for a do-it-yourself lava lamp:
● A transparent flask or bottle
● Vegetable oil – vegetable or baby oil will also work
● Water
● Food dyes – bright colors give the best effect!
● Alka Seltzer Tablets – You can find these at your supermarket or local convenience store. Pharmacy
How to do it:
Step 1: First, fill the flask about ¾ full with vegetable or baby oil.
Step 2: Then add some water to the flask, being careful not to overfill it. Allow the water and oil to settle. You will see the oil and water separate into two different layers.
Step 3: Add a few drops of food coloring to the flask.
Step 4: Finally, cut the Alka Seltzer tablet into pieces and add it to the flask.
This will trigger a chemical reaction, the fun part of this science experiment, and create a lava lamp effect inside your flask!
Related: Getting kids involved in science activities early on will help them develop a natural love of science and ignite their curiosity. Combine this activity with more simple and easy preschool science experiments to hone their inner sense of wonder!
Science behind a lava lamp Scientific experiment
There are several scientific concepts behind the impressive effect that a lava lamp creates. You can encourage your children to think about the following:
Concept 1: Why did water and oil separate into two layers?
This is due to a physical property of molecules known as polarity. Polar and nonpolar liquids are immiscible, that is, they do not mix.
Liquids of the same polarity mix, while liquids of different polarity separate into layers.
A molecule is considered polar if the positive and negative electrical charges are unequally distributed.
Examples of polar liquids are ethanol and hand sanitizer. Gasoline and most oils are non-polar liquids.
Water is a polar liquid, that is, it has an uneven charge distribution around it. Each water molecule consists of two hydrogen atoms and one oxygen atom.
Hydrogen atoms give water molecules a positive charge, while Oxygen atoms give water a negative charge.
But what actually causes the uneven distribution of charge in water molecules is their bent shape. This shape causes the positive charge from the Hydrogen atoms to accumulate at one end of the water molecule and the negative charge to accumulate around the other end of the molecule, resulting in an uneven charge distribution.
On the other hand, oil is a non-polar liquid. This difference in polarity prevents the oil and water from mixing and separating into two layers.
Concept 2: Why does the water layer sink to the bottom?
Density is another physical property of matter. Density is nothing more than how densely (or loosely) things are arranged in a certain space.
From a scientific point of view, density can be defined as mass per unit volume.
D = mass/volume.
This means that a dense material packs more matter per unit volume than materials with a lower density.
This makes denser materials heavier per unit volume compared to less dense materials. dense.
Different materials have different weights for a given volume. Water is denser than oil, therefore heavier. That is why it sinks to the bottom of the flask, and the oil floats above the water.
You can demonstrate the density of liquids with a simple experiment. Take two identical flasks and fill one with water and the other with oil.
Have the children weigh each flask using a scale and record its weight on a piece of paper.
You will see that the water is heavier. Encourage your children to share their reasoning for why water sinks to the bottom and oil floats to the top.
Related: Combine this experiment for kids with indoor activities for kids to make learning fun.
Concept 3: Why do bubbles keep moving up and down?
The following key processes take place:
1. Alka Seltzer and water react to form carbon dioxide.
2. Carbon dioxide (CO2) forms water bubbles.
3. Since CO2 is light, the bubbles float to the top and pop to the surface.
4. Popped water bubbles release carbon dioxide and leave behind water droplets.
5. Since water is heavier than oil, the water drops sink and fall to the bottom again.
6. The process continues as a cycle, creating a beautiful, mesmerizing lava lamp effect.
There are a few improvisations you can do to improve your chemistry skills! You can ask children to test the rate of a chemical reaction under different conditions, for example:
Improvisation 1: warm water vs ice-cold water
Ask your children to compare the number of bubbles formed. At higher temperatures, the water molecules and Alka Seltzer move faster and bump into each other more often, so you’ll see a higher rate of reaction with the warm water.
Improvisation 2: whole tablets or small pieces or powder
Teach the children that powder forms bubbles at the highest rate because of the larger surface area of contact. To explain this concept, you can even talk about the time it takes for sugar crystals and cubes to dissolve.
Related: After your kids enjoy the bubble experiment, teach them how to make bubbles with this easy bubble solution recipe.
An experiment with a do-it-yourself lava lamp without Alka Seltzer
To make a lava lamp without Alka Seltzer, there are a few simple alternatives you can find on hand in your pantry.
Baking soda and salt are popular and easy alternatives that will do the same magic, but without the fizzy pill. These fun ideas can easily be turned into fun birthday activities.
An experiment with baking soda in a lava lamp
Baking soda is a good substitute for Alka Seltzer tablets. But you need to make some changes to the lava lamp science experiment with Alka Seltzer.
Use vinegar or citric acid (lime/lemon juice) instead of water.
How to do it:
Step 1: Add 2-3 tablespoons of baking soda
Step 2: Add oil to ¾ of the flask
Step 3: Add a few drops of food coloring to the vinegar or lime juice and stir.
Step 4: Using a dropper, carefully add the vinegar and food coloring solution to the flask.
Baking soda is a base, and it reacts with acids like vinegar and lime juice to form boiling carbon dioxide.
Actually, there are many acids. and bases that can be found at home. A great science activity for kids would be to put some of these together and have the kids guess whether they are acids or bases. Some items may be:
● Toothpaste – Base
● Carbonated drinks – Acid
● Soap – Base
● Cleaning powders/detergents – Base
● Citrus like lime, orange or lemon – Acid
You can use a litmus test to see which category the collected items belong to – Acid or Base.
Related: Kids love the sizzling, bubbling reaction. Check out what you can do with two simple pantry ingredients with baking soda and vinegar Experiments for Kids.
Home experiment with a lava lamp with salt
Another alternative to Alka seltzer is table salt. Table salt has the same effect, but works very differently than Alka Seltzer and baking soda.
Here’s how to make a salt lava lamp:
Step 1: Follow the same steps as the original lava lamp experiment.
Step 2: Simply replace the Alka Seltzer with 2-3 tablespoons of salt.
You should see the lava lamp explode. Your kids have probably mixed salt and water before, but would never have seen the gas bubbles form. Have your children consider how a lava lamp works with table salt.
Quick Tip: Add some humor to learning with these fun science jokes for kids. They will definitely speed up learning and the concentration of attention of your children.
Science behind a lava lamp Experiment with salt
When you add salt to the flask, it sinks to the bottom of the flask because it is heavier than the oil and water. But when the salt gets through the oil, some of the oil gets trapped in the salt crystals and sinks to the bottom.
As the salt gradually dissolves in the water, the oil floats back due to its lower density compared to water.
A lava lamp that glows in the dark
A glow-in-the-dark lamp is a mesmerizing version of a simple lava lamp. For this option, you will need glowing water. To get this effect, simply replace the water with glowing water.
Glowing water is a unique type of liquid that has the property of bioluminescence. Bioluminescence makes glowing water glow in the dark.
After you have added the food coloring, turn off the lights in the room before adding the Alka Seltzer tablets to the flask.
DIY glowing water
There are a few drinks that are relatively easy to find that can create a glow effect!
The drinks below produce bright colors under black. light:
● Tonic water – blue
● Vitamin B drinks such as energy drinks – bright yellow
● Syrup – golden yellow
● Sprite, Mountain Dew and other clear drinks
By using some of these drinks instead of water, you can also create your own glow-in-the-dark lava lamp at home! In addition to drinks, you will need a source of black light. It is a source that emits ultraviolet light.
In addition to these drinks, you can use glow-in-the-dark pigment to add to regular water and use it for a glow-in-the-dark lava lamp.
To you…
In any version, lava lamps are an experiment around which many children gather. Don’t forget to help kids understand the science behind the lava lamp to make it a full learning experience and bring hands-on learning to the table.
All children will love science when it is presented to them in an exciting and enjoyable way! Have fun!